Monday, July 30, 2012

Ride to Mont Tremblant Park with the Rally: part 2


See part 1

3. Turn left on Harrington road then right on Red River (Riviere Rouge) road…

Despite the fact that Red River road is a gravel road, it does not require any particular riding abilities nor a specific bike – a cruiser could ride here no problem.

So this road is not a challenge for the 1200GS Rally.  However, the TKC 80s tires installed on the bike, as well as its torquey engine can turn this road into a somewhat interesting playground.

A couple of things worth nothing: the view is magnificent along the Red River and the hillside fields offer a panoramic view as well.

If you pay attention, you cannot miss the Buddhist monastery on the right side of Red River road.

I like to stop at this place from time to time to take some pics, the change of scenery is astonishing – each time I get the feeling I took a bypass to Asia.

I am not Buddhist of course, but the monks that live here are very courteous and accept “visitors” into the area.  While remaining respectful of the place I take some pictures and  continue my journey.

4. Continue on Red River road, then take the 327 North, then the 117 South and finally take the exit to Lake Supérieur…

Following the Lake Supérieur road, you eventually arrive in Lake Supérieur town.  The landscape here is absolutely beautiful and I could not resist: I stopped to take some pictures.  Above, the Lake Superior with a mountain range in the background.


Other pictures of Lake Supérieur.  Left, a steep hillside that seems appropriate for climbing.  Right, a windsurfer on the Lake Supérieur.

5. Continue on Lac Supérieur road…

…that eventually lead to the Mont Tremblant Park gate.  There is a 6$ fee per adult (there is a family fee of 12$).

Once in the park, it's a cascade of breathtaking landscapes. The Mont Tremblant Park is certainly one of the most beautiful places in Québec.


For the early birds (you must arrive at the park entrance in the morning to register), it is possible to ride down the river by canoe.

6. Optional, turn right onto 15 East ...

The 15 East (unpaved road) proved to be the highlight of this tour.

At some point, I thought I was dreaming - I was driving a beautiful motorcycle on a gorgeous road while a splendid summer sun illuminated my path.

Here are some pictures of this paradise ...


I still get chills looking at these pictures. Several times during the ride I told myself: “I’m such a lucky bastard to see all this!  Someone pinch me!”  What a beautiful moment of moto adventuring ...

To be continued…see the last part.

Ciao!

dsaq

Friday, July 27, 2012

Ride to Mont Tremblant Park with the Rally

IMG_0024_thumb3

I went for a day ride with the 1200GS Rally to get acquainted.  The day was perfect – forecast was sunny with passing clouds, temperature: 70 Fahrenheit (20 Celsius).

The path that I followed to get to Mont Tremblant Park was somewhat tortuous.  Here’s the description.

1. Follow the 344 west alongside the Ottawa river…

For most Lower Laurentian motorcyclists the 344 is one of the most scenic roads in the area.

Before stopping at Carillon village to take this shot with the Hydro Quebec dam in the background, I was telling myself: “Wow!  What a great motorcycle!  The thrust from the throttle opening is just great and at all speeds, I must mention it in my ride report ... the saddle is really comfortable ... it's pure bliss ... I cannot believe I’m about to throw this wonderful bike on the unpaved roads ... I'm completely nuts ... etc etc ". In short, quite a monologue in my head.

As I planned to go for the day and I had no hard case provided with the bike, I strapped a rigid bag (Bags-Connection) that I bought years ago for a ride to Pennsylvania.  As you can see on the picture, the bag was a perfect match for the Rally!

2. At Grenville, turn left to the north and continue on Scotch road…

IMG_0026_thumb8

It's not a coincidence that I took Scotch road for this ride: to understand the bike’s behavior on rough roads. So here's how everything took place.

As usual, I stopped on the edge of this lake for a caffeine break.  I like the sight and contact with nature that this place offers.

After a while, two fellow adventurers I had seen before joined me. One named Martin and the other…well, unfortunately, I forgotMoi ?

Briefly, two great guys who chat on RidAventure.ca motorcycle forum. They enjoyed the Rally and were surprised to learn that I was from St-Eustache: "Huh? Weird ... your bike has an Ontario plate". I explained that it was a borrowed bike…hopefully they did not think I had stolen it!  One thing led to another, and they invited me to follow them.  I told them: "Sure! I have no specific plan, but do not wait if you lose sight of me, I would rather not take chances with the BM..."

So I started to follow these two amateurs ... but not for long!  These guys were great riders - they vanished in a flash!  The bright side is that in trying to follow them, I greatly increased the pace at which I used to ride on the bumpy Scotch road (especially after heavy rains the previous day). I noticed how the Rally suspension was effective and able to handle the obstacles while remaining stable. A world of difference with my Versys which requires much more caution.

Speaking of suspension, the Rally was equipped with electronic suspension (an option).  There are as many modes as one can ever imagine:

  1. one up;
  2. with luggage;
  3. with a passenger;
  4. with a passenger and luggage; 
  5. light off-road; and finally
  6. heavy off-road.

Each mode can then be configured as comfortable, normal or sport.  Total: 18 possible configurations at the tip of my fingers...a real gem!  Electronically adjustable suspension is the option I liked the most on the bike – and sincerely all road bikes should offer this feature.

IMG_0029_thumb4

Testing 1..2..3.  I took this picture when I was on my break before chatting with the two "amateurs".

I was often frustrated in the past because I was using my iPhone for photos and missed many wildlife moments. The day before the ride, I bought a Canon SX 230 HS with integrated GPS. It's always interesting to have the location of the images when you look at them back home ... but still, one needs to turn on the function!

Yes…I did not Triste

In short, with a 14x optical zoom, I was able to photograph these two tiny frogs.

IMG_0030_thumb11

Here is an overview of Scotch road in one technical section. A 4x4 would probably pass, but forget it by car.

Again, I was able to enjoy the low-end torque of the bike on my way up this path. Gear changes are optional!

Another thing I liked about this bike is the natural position when standing on the pegs.  It seemed like I could ride for miles without using the seat.

To be continued…next, part 2
dsaq
 

Related Reading:

Saturday, July 21, 2012

BMW 1200GS Rally 2012: First Contact

1200GS Rally 2012

Fan-tas-tic!  That is the first thought that came to mind after a first day with the 1200GS Rally edition.

It is sublime, powerful, comfortable and so on… this bike has all the charm needed to win over a motorcycle adventurist.

When I asked my contact at Moto Internationale if it would be possible to have dual sport tires, BMW Canada authorized the installation of TKC 80s to allow me to ride the bike under many different conditions.

So the plan for next few days is:

  • ride long distances on paved roads to better evaluate seat comfort, wind protection, gas consumption and better understand what 110 hp @7750 rpm means!!;
  • ride the Scotch road, the best place I know for a first feeling of a bike on unpaved roads;
  • then the Lac des Plages (Beaches Lake) fire roads;
  • and more…

The Quebec motorcycle “bible” (Guide de la moto 2012) rants and raves about the bike – so my expectations are high, but based on this first day, things are off to a good start!

Read more: Ride to Mont-Tremblant

Ciao!
dsaq
dsaventure logo5-transparent

Friday, July 6, 2012

Evaluation: Seat Concept part 2

See part 1

Installation

Removing the original seat foam and cover is a breeze and takes only 15 minutes.  The installation of the new components takes some more times and one should not be afraid to start over if the result is not perfect.  Practice makes perfect.  At a first attempt to install a seat, you can count around 2 hours of work.  An experienced person can make this in 45 minutes.

I attached some pictures of the new seat installed below.

IMG_0878_thumb6


IMG_0879_thumb23


IMG_0874_thumb37

I am pretty happy with the result.  As a bonus, the new cover looks sharp!  The carbon fiber texture is quite appealing.  I would have like the stitches color to match the bike color, but that would have limited potential buyers if I ever need to sell it.

First impression

Once the seat installed I went for a 20 miles ride in the country side on Rivière Sud (South River) road with my 11 years old daughter. 

Thank goodness!  The forward slope effect from the original seat is gone – wouhou!!  Only for this reason that worth it.  During that ride, I even went for a short off-road ride close to the Exotarium and I discovered an ostrich farm not to far away.

IMG_0854_thumb8

For a moment I had completely forgot the purpose of this ride.  The new seat was comfortable and out of my mind: +1.

However, after a longer moment on the seat I started feeling a discomfort at the crotch.  I think the seat foam is not hard enough – the sit bones digs into the foam and pressure builds up at the crotch.  That could also be the pair of Jeans that I was wearing at this moment that were not adequate...may be.

Verdict.  First impression I had was great. Note that I felt much higher than the OEM seat.  The fact that I had a bar raiser installed helped for the comfort.  I should probably do a little adjustment on the handle bar (lean backward).  For a fair review I`ll need to ride the bike for a longer period of time to really compare with the original seat.

After a few more rides

The seat is way too high.  I have been commuting for 2 days: St-Eustache to downtown Montreal near the Bell Center (35 miles).  Before I install the new seat I was already short having both heels on the ground.  Now, I am tiptoeing even more - very inconvenient in stop and go traffic.  Neither appreciated on the highway – the additional height makes a noticeable difference on the air pressure against the helmet.

The seat is certainly more comfortable that the OEM one, however I should have waited for the low version of the seat - it will be available in 5 months as per the sales rep at Seat Concept.

The additional height would most likely be less noticeable if my tires were not high profile dual sport ones.  Also note that I customized my original seat a couple of times to make it more comfortable - I removed almost an inch of foam in the process.

My recommendations so far would be: if you are 6 foot tall and up, go for it, otherwise wait for the low version of the seat (I am 5’8).

Update July 15, 2012

I have been using the bike for much more time now, and I can tell without a doubt that this seat is fantastic, really.  It looks like a period of time is required to get used to it.  Or perhaps the foam needs to be broken in.

For the seat height problem: my soon, he is fifteen and 5’10”.  He can sit on the bike an have both foot on the ground without a problem – so I have probably exaggerated a little bit in my first recommendation, I suggested to be at least 6’ to consider ordering this seat and wait for the low version of the seat if one is less than 6’ tall.  So, new recommendation: 5’10” or more you should be fine, less than that wait the low version.  Of course that may vary depending on your inseam. 

To fix my personal issue with the seat height, I contacted the company and they agreed to replace the seat when the low version will be available.

To be continued...

Wednesday, July 4, 2012

Honda to participate in the 2013 Dakar Rally

July 2, 2012 - Honda has announced its intention to participate as a works team in the motorcycle class in the Dakar Rally to be held in January 2013 in South America, travelling north to south through Peru, Chile and Argentina. Honda competed nine times in the motorcycle class in the forerunner of the present Dakar Rally, the Paris-Dakar Rally, from 1981 through to 1989, and was a winner five times during that period. Honda's return to Dakar Rally next year will be the first in 24 years since 1989.

Image sketch

The Honda team, to be called Team HRC, will include Portuguese rider Helder Rodrigues, who took third place in the 2012 Dakar Rally, and Brazilian Felipe Zanol, who brings a wealth of experience in motocross and enduro race events, as well as Sam Sunderland (United Kingdom) and Javier Pizzolito (Argentina). They will ride a prototype machine developed and produced by the Motorcycle R&D Center at Honda R&D. The prototype machine is based on the CRF450X, the popular worldwide enduro racing model that combines ease of handling with superior competitive strength. Kit parts designed for use on the standard CRF450X model have also been developed and will be made available to a limited number of teams.

Tetsuo Suzuki, President, Honda Racing Corporation, commented “The Dakar requires competitors to cover several hundred kilometers per day for more than two weeks. It needs a totally different type of vehicle from events such as motocross, trials and road races. Honda has put a great deal of effort into designing and building a powerful and winning machine. We are aiming for the championship from this first year.”

[SRC: HONDA]

Sunday, July 1, 2012

Evaluation: Seat Concept

I had a few occasions to ride on long day trips with my Versys.  The last time was in May – to Otis,MA and then back home. That was about an 800 mile ride.

Each time I go for a long ride, the Versys seat becomes uncomfortable after a couple hundred miles.  I tried a couple of times to fix the problem by customizing the seat: I changed the angle and carved a V shaped pillion in the seating area.  Certainly, those modifications were beneficial... however, there was still room for improvement.  Worse, my wife cannot stand the rear seat for more than 20 minutes without feeling the discomfort of the foam.

So time had come to try an after market seat.  While searching on kawasakiversys.com I found a thread on Seat Concept proposition  for the Versys. (By the way, there is a coupon code: KLR650.NET that I found on the kawasakiversys forum.)  Contrary to other manufacturers, Seat Concept only builds replacement foam and seat covers.  You need to disassemble your motorcycle seat and install the foam and seat cover on the original pan.  The good side of this approach: the cost stays reasonable at around 200$.

Required tools

The first time I made a custom modification to my seat I used a manual stapler as on the left picture.  It worked fine. 
But this time I decided to buy an air stapler which I thought would simplify the stapling process – about 60 staples are required.  I shopped around and found this one - Surebounder 9600 – for only 40$ at Langevin-Forest in Montreal Nord.  If you can’t find them, there is always the Paslode staplers that are available everywhere but at twice the price.

I found the same air stapler on Amazon for only 25$.  If you ever order this one, make sure to also order the required T50 staple pack.  Seat Concept recommends the 1/4 or 3/8 in length staples.

:

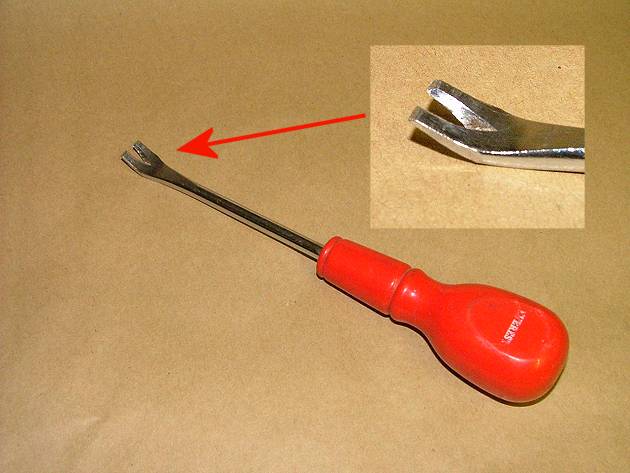
The other required tool is a simple flat screw driver to remove the staples that hold the original seat cover to the plastic pan.  I used a nail puller similar the one on the left picture.


Seat Concept recommend to use spray adhesive to glue the foam against the plastic pan, but I did not do it.

To be continued…